My younger sister, Megan, is working on a project I want to share with you here. Megan's best friend from college, Jen, had her beautiful baby girl, Lydia, go to live with Jesus a couple of months ago. I can't imagine how devastating it would be to lose a child, even though you have faith that your baby is now in the arms of our loving God. Her whole story can be found here on Jen's blog. Bring tissues. Lots of them. It's an incredible journey of faith, hope, and loss.
Jen and her husband, Micah, are in the midst of grieving, but have still set up a memorial scholarship fund in Lydia's name at the Christian school where they met as students, and taught as adults. Megan really wanted to support her friends and honor the memory of Lydia, and blogs about her contribution here on her blog. She is making the most beautiful purple felted flower pins with 8 petals, and 8 seeds to represent the 8 months, 8 days that Lydia graced us with her presence on earth. Every penny of every sale goes towards the scholarship. Please check it out! (I've also added a link on my page if you'd like to directly link to Megan's blog.) And please pray for Jen and Micah as they continue to mourn the loss of their little girl! Sometimes God does things that I just don't understand.
Saturday, July 10, 2010
Wednesday, July 7, 2010
Baby Project #5 - Baby shower gift
I love giving kits as gifts, don't you? Whether it's a popcorn and movie kit (popcorn, movie rental cards, movie theater candy, and popcorn toppings in a big bowl), or a cookie making kit (ingredients for cookies, spatula, cookie sheet, and oven mitts), I think it's so fun to give a gift that has all of the pieces needed to make memories, have fun, or get a job done. Well, changing diapers is no exception. Although decidedly not as fun and exciting as baking cookies, it is a necessary evil of all new parents, and I just love the idea of having everything you need in one place. That's how I came up with the diaper wrap. I have posted on this blog before about it being my go-to shower gift, but I have changed the pattern a bit due my sister's critique of the changing pad being too small (thank you, Megan). And now, it's better than ever!
I used some coordinating fabrics from my favorite reproduction 30's pattern stash (the most awesome Christmas present EVER from my Mom!) and some quilting binding I had had on hand. Besides the changing pad, I also like to give the new Mommy-to-be a couple of newborn diapers, and a package of travel wipes. I'm in the process of putting together a tutorial for this little present now, but it will take me a little more time to put the finishing touches on it.
Tuesday, July 6, 2010
Father's Day Present
Oooo.... It's been a long time since I've posted anything here. I have been so tired lately, and I'm really ready to have this little baby so I can start feeling like a real person again! Bed rest continues, as well as meds and monitoring, and not sleeping, and having to pee all night long.... But it will all be worth it when we get to meet our little boy! We just can't wait!!!
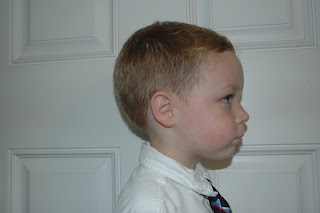
While sitting at the dinner table a couple of weeks ago, Jared made a comment about the adorable shape of Jesse's head. I thought this was a funny thing to say, but it sparked an idea for a Father's Day present. And here it is (with a little tutorial in case you want to make one for the Daddy in your life):
While sitting at the dinner table a couple of weeks ago, Jared made a comment about the adorable shape of Jesse's head. I thought this was a funny thing to say, but it sparked an idea for a Father's Day present. And here it is (with a little tutorial in case you want to make one for the Daddy in your life):
1. Get squirmy 4-year-old boy to hold still for a picture in profile.
There. That's better.2. Assemble your supplies:
* Printer with paper
* Scissors
* Scraps of fabric for the profile (I chose black.) and background (red with polka dots)
* Iron-on adhesive (I used HeatnBond Lite)
* Frame or cards for the finished product
3. Print out paper copies of profile, and cut around the profile, keeping all the detail you can intact. (Micah's picture was a little easier to procure since I already had his profile from an early ultrasound.)
3. Iron adhesive on silhouette fabric using manufacturer's instructions.
4. Lay the picture on the adhesive's paper lining and trace around it. (Right after I traced this, I realized I wanted him to face right, so I retraced the profile the opposite way and didn't get a new picture - sorry!) Cut out carefully.
5. Measure the size of your background fabric to fit the frame. I used the mat as a guide and added an inch around each side.
6. Lay the silhouette on the background fabric. Peel off paper backing from iron-on adhesive, and iron on to background fabric using manufacturer's instructions.
P.S. I chose a card for Micah's profile because it was from a very early ultrasound, and I wanted to make a framed version of his profile when he comes out. Oh! And Jared just loves that we now have a permanent record of the adorable shape of Jesse's little noggin! I also got Jared this book and it's absolutely perfect for my geek husband with (soon to be) two fun, curious little boys. Check it out if you get a chance!
Subscribe to:
Comments (Atom)


